
电子发烧友网站提供《Nerd无线电子宠物开源设计.zip》资料免费下载
2022-11-22 14:41
基于小凌派RK2206的智能电子宠物本项目由宁德师范学院李文宇、陈志澎、林锦湖同学完成,作品获得福建省首届开源鸿蒙开发者大赛三等奖,感谢杨烈君老师倾情供稿!1、项目背景 随着国内经济的发展,电子
2023-01-19 12:48
电子发烧友网站提供《一个真正的Arduino UNO电子宠物模拟器.zip》资料免费下载
2022-10-21 10:16
本帖最后由 2119124 于 2012-6-8 10:46 编辑 Ollie is an open source blimp-based autonomous and ambient robot that dwells in human habitats. Ollie is observant, often flying in a manner suggesting curiosity for the world around him. Ollie reacts to voices by excitedly flapping his wings, communicating his friendliness and eagerness to be noticed. Ollie wants to know about humans and yearns for their attention.Ollie has an Arduino brain, wings to fly and a microphone to listen. In this instructable I will teach you how to make Ollie so you can meet him too. Please contribute suggestions, experiments, tweaks, hacks and discoveries of your own process here and comment on www.meandollie.com. The main parts needed are :1 Arduino Pro Mini 328 – 5V/16 Mhz1 FTDI cable or breakout board to charge Arduino Pro Mini1 Electret Microphone1 Polymer Lithium Ion Battery 850 – 900 mAh2 Blue Arrow 3.6 Gram Micro Servos1 36″ Mylar balloon envelope 1 30 guage wire/ wire-wrapping wire in 2-3 colors1 LED1 Sheet of Mylar or foil for wings1 Spool of sculpture wire for wings1 Helium tank or access to a party store1 Switch1 3.9 KΩ resistor1 4.7 KΩ resistorAdditional itemsArduino Uno or other (for testing)Breadboard22 or 24 guage wireLightweight tapeSmall weighing scaleSoldering iron and solderQuick-setting EpoxyGlue gunPlaydoh or claySmall cupsCutterWire stripperWire wrapping toolMaking the Wings Bend sculpture wire to create 2 identical wing shapes. Try toconserve amount of wire used to minimize weight. Use epoxy to secure theends.Attach servo accessory to the ends of the wings keeping check oforientation and secure with epoxy. Secure with small pieces of tape ifnecessary.Cut out identical pieces of Mylar or foil and attach to wire shapesusing a glue gun. Leave the foil loose when attaching so it takes ahemispherical shape when wing is flapped.Attach wings to the servo.Wire up the servos using wire-wrapping wire.Plug the control wires from the servos to digital pins 2 and 4 andconnect to 5V power and ground on a breadboard and/or Arduino Uno (for testing)Upload a basic servo program to check wiring making sure that both wings exhibit identical motion.If wings are not moving check continuity in circuit, secureconnections and try again. If circuit works, disconnect and preparewiring for Arduino Mini Pro.Insert servos through 2 small identical plastic cups and glue tosecure in place. Make sure wings move without any obstructions. Cups areuseful in attaching wings to the balloon and hiding wires.Mark points on the empty 36″ blimp envelope where wings will bemounted. Points should be in exactly opposite on the balloon surface andprovide balance to the blimp.Cover the cups with Mylar foil using glue gun.Fill up 36″ Mylar envelope with Helium.Attach servo cups to the balloon using small pieces of tape. Let wires hang loose.Cover the tape with pieces of Mylar or foil.Adding Microphone and LEDPower the Electret mic through Arduino Uno as shown in circuitdiagram using 2 resistors of 3.9Kohm and 4.7Kohm. Control wire should beplugged into analog pin 2 of Arduino.Connect LED to digital pin 13 on Arduino Uno.Make sure all connections are secure.Resistors are used to increase the amplification of the signal received from the Electret mic and should be wired correctly.Run this simple program to make sure input is being received. LEDwill light up whenever a certain threshold of volume is reached. Thisthreshold should be set to a normal or loud talking volume.int buffer = 0;//Sound variablesint potPin = 1; // select the input pin for sound sensorint ledPin = 13;// select the pin for the LEDint soundVal = 0;void setup(){pinMode(ledPin, OUTPUT);// declare the ledPin as an OUTPUTSerial.begin(9600);// open the serial port at 9600 bps:}void loop(){ //Sound soundVal = analogRead(potPin); //Serial.println("Listening............"); if( soundVal>1020 ){Serial.println("VERY LOUD!");digitalWrite(ledPin,HIGH);} else if (soundVal750){if (buffer == 0){Serial.println(soundVal);buffer = 15;digitalWrite(ledPin,HIGH);}else{buffer--;} } else{ digitalWrite(ledPin,LOW);}}If the circuit is not working play with the values in the program and make sure resistors are wired correctly.If the circuit works, wire everything up according to the circuitdiagram. Attach toggle switch and LiPo battery to the circuit. Solderall the wires directly to each other and secure with hot glue.Upload the final Arduino sketch given below to the Pro Mini using FTDI cable or breakout board.#include SoftwareServo myservo;// create servo object to control a servoSoftwareServo myservo2;int goUp = 0;int val = 0;int wait = 0;int flyFor = 0;long flapTime = 0;int angleMin = 0;int angleMax = 120;int upSpeed = 20;int downSpeed = 1;int buffer = 0;//Sound variablesint potPin = 1; // select the input pin for sound sensorint ledPin = 13;// select the pin for the LEDint soundVal = 0;void setup(){pinMode(ledPin, OUTPUT);// declare the ledPin as an OUTPUTmyservo.attach(2);// attaches the servo on pin 2myservo2.attach(4);Serial.begin(9600);// open the serial port at 9600 bps:}void loop(){// Servoif (flyFor < flapTime){ if (wait == 5){if (val < angleMin){goUp = 1;digitalWrite(ledPin,HIGH);}else if (val >angleMax){goUp = 0;digitalWrite(ledPin,LOW);}if (goUp == 0){val-=upSpeed;}else {val+=downSpeed;} } wait++; if (wait > 200)wait = 0; myservo.write(val);// sets the servo position according to the scaled value myservo2.write(120-val); SoftwareServo::refresh(); flyFor++;}else{//Sound soundVal = analogRead(potPin); Serial.println("Listening............"); if( soundVal>1020 ){Serial.println("FREEAK OUT!");upSpeed = 15;downSpeed = 15;angleMax = 45;angleMin = 10;flapTime = 6000;} else if (soundVal750){if (buffer == 0){Serial.println(soundVal);upSpeed = random (1, 20); //1 to 30downSpeed = random (1, 30);// 1 to 30angleMax = random (110, 120);angleMin = random (30, 45);flapTime = 10000 + random (5000 , 10000);flyFor = 0;buffer = 15;}else{buffer--;} }}}Solder connections to the Arduino Pro Mini very carefully according to the circuit diagram. Attach circuit to bottom of balloon using small amount of foil or tape.At this point circuit will be light enough to be lifted by theballoon or just the right weight to keep it in equilibrium. Adjust with a small amount of clay if circuit is too light. Ollie is ready to fly. Turn the switch on so Arduino Pro Mini ispowered with the battery. Ollie will flap his wings whenever he hearsyou talk or a loud sound is made. Ollie will randomly burst into flightand bring happiness and joy in the life of many.
2012-06-08 10:42
一款小凌派RK2206开发的智能电子宠物,OpenHarmony轻量级操作系统设计。以房间内声源,物体,无线信号,人等为研究对象,组成一体多功能的家居电子宠物,同时与小
2023-01-31 09:53
本项目由宁德师范学院李文宇、陈志澎、林锦湖同学完成,作品获得福建省首届开源鸿蒙开发者大赛三等奖,感谢杨烈君老师倾情供稿! 01 项目背景 随着国内经济的发展,电子宠物市场发展面临巨大机遇和挑战。在
2023-03-10 11:30
Arduino本质上是一种电子工具,它可以被用来制作许多有趣的创意电子制作,比如电子时钟、四轴飞行器、宠物喂食机、3D打印机、电
2019-05-30 06:09
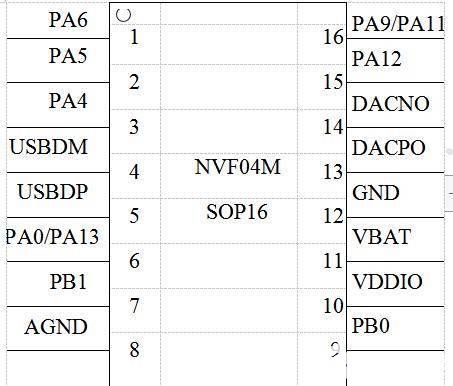
以产品为导向,忽略了宠物主人的诉求。 为了更好的给铲屎官们提供更优质的产品和服务体验,提高用户与萌宠的生活质量,九芯电子和厂商合作,在宠物自动喂食器中置入NVF04M录音芯片,可以语音提示
2022-11-14 17:00
《旅行青蛙》离场,二十多年前的情怀电子鸡你还养不养? 落寞的《旅行青蛙》就这样背上它的小书包,踏上了无数过气网红都要走完的后半生。 且慢,如果你已经厌倦养育小青蛙,还愿不愿意尝试养一只名叫拓麻歌子的「电子鸡」呢?毕竟,已经 22 岁高龄的这只
2018-03-06 16:44
最新想琢磨一个电子宠物,就是想让他跟我这后面走。老师告诉我可以用手机的陀螺仪,但是对于我来说,这真是新的领域啊,零基础。今天看了一天,也不是太懂。求大神指导,告诉我到底怎么样能将手机陀螺仪与单片机连接起来,陀螺仪穿出的数据如何处理。
2014-11-04 21:51